Contactless menus became mainstream in India after 2020, and adoption has continued growing — driven by hygiene awareness, smartphone penetration, and the practical benefits for restaurant owners (no more reprint costs, instant updates). This guide is the complete playbook for setting one up.
What You'll Have After This Guide
- A live digital menu at a permanent URL
- A QR code ready to print and place on tables
- Your FSSAI number and veg/non-veg indicators displayed
- Staff trained on how to present and support the new menu
- A WhatsApp-shareable menu link for delivery and takeaway
Complete Setup Guide
Sign Up for DineWave (2 minutes)
Go to dinewaves.com and create a free account. Enter your restaurant name, city, and cuisine type. Your restaurant profile is set up automatically. No credit card needed.
Enter Your Restaurant Details (5 minutes)
Fill in: restaurant name, address, phone number, opening hours, FSSAI license number (14 digits), and upload your logo if you have one. This information appears on your menu and satisfies FSSAI display requirements.
Create Your Menu Structure (10 minutes)
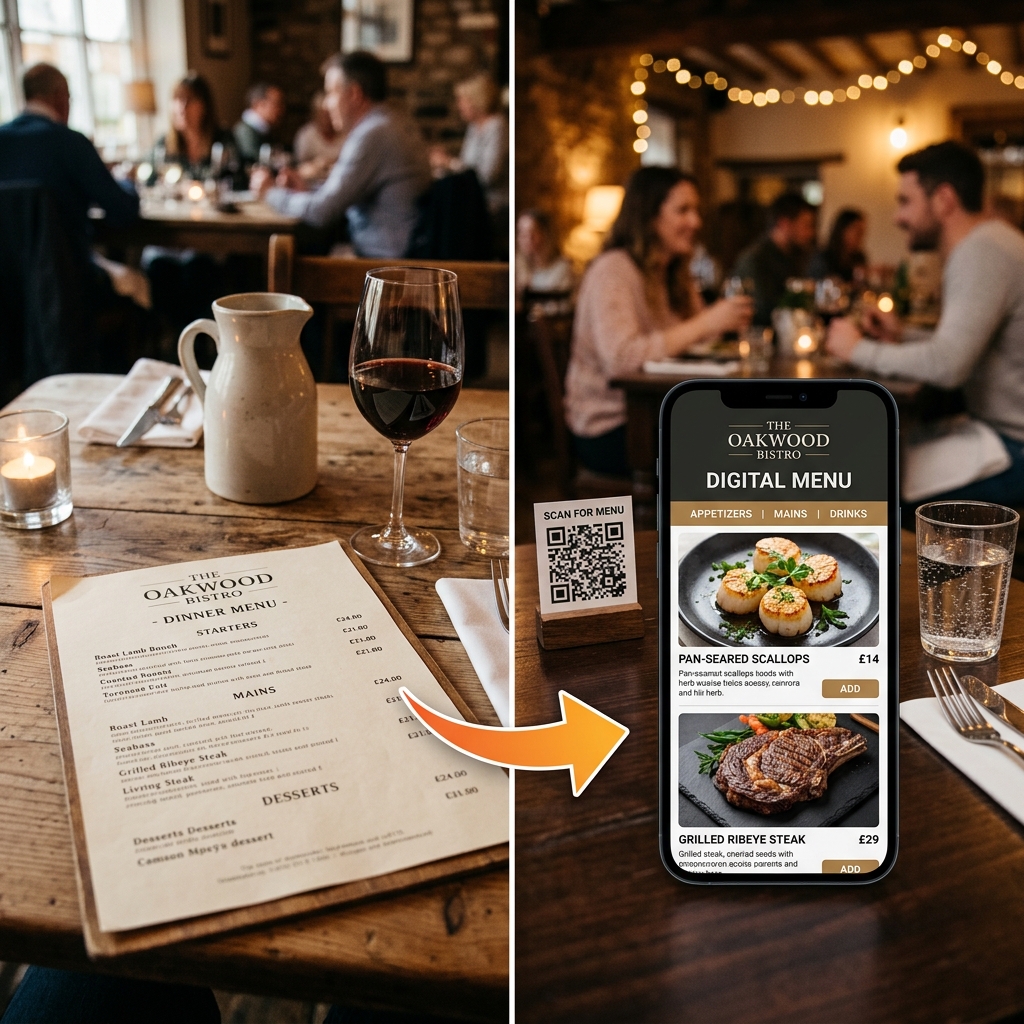
Create categories first: Starters, Main Course, Rotis & Rice, Beverages, Desserts (customise to your menu). Then add items under each category with name, description, and price in ₹. Set each item as Veg or Non-Veg — the correct Indian symbol (green/brown dot) appears automatically.
Add Photos (Optional but Recommended — 10–20 minutes)
For each dish, add a photo from your phone gallery or take a new photo. Place the dish near a window in natural daylight. Avoid flash. Even simple phone photos dramatically increase order rates for those items. You can start without photos and add them later.
Preview and Publish Your Menu (2 minutes)
Use the preview button to see exactly what your customers will see. Check that: prices are correct, veg/non-veg indicators are right, your FSSAI number is visible in the footer. When ready, hit Publish. Your menu is now live.
Download and Print Your QR Code (5 minutes)
Download your QR code as a high-resolution PNG from the DineWave dashboard. Print options:
- Self-print: Print A5 size on card paper, laminate at a local shop (₹5–10 per sheet)
- Table tent cards: Print on folded card stock — stands upright on tables
- QR standees: Order acrylic QR standees from Amazon India — ₹80–150 each
- Stickers: Print QR stickers for existing menu covers, walls, or delivery packaging
Place QR Codes at Your Restaurant (10 minutes)
See the placement guide below for optimal positioning. As a rule: one QR per table at a clearly visible location, one at the entrance, and one at the billing counter.
Train Your Staff (15 minutes)
Review the staff scripts below. The key: staff should be confident presenting the digital menu, able to assist customers who can't scan, and know how to update the menu themselves.
Optimal QR Code Placement
📍 Table Top
Centre of table or near condiments. Minimum QR size 5×5 cm. Ensure good lighting.
📍 Table Tent
Folded card standing upright. Eye-level when seated. Add "Scan for Menu" label.
📍 Entrance
Near door or waiting area. Lets customers browse before sitting. Also good for takeaway.
📍 Billing Counter
Useful for takeaway orders. Customers can scan and review before ordering at counter.
📍 WhatsApp / Instagram
Share your menu URL (not QR image) directly. Customers tap a link, no scanning needed.
📍 Delivery Packaging
Print QR on boxes or bags. Customers reorder via menu link next time. Free marketing.
QR Code Physical Setup Cost
| Setup Option | Cost per Unit | For 20 Tables | Notes |
|---|---|---|---|
| Self-printed + laminated | ₹8–15 | ₹160–300 | DIY, basic but functional |
| Printed table tent cards | ₹20–40 | ₹400–800 | Professional print shop |
| Acrylic QR standees | ₹80–150 | ₹1,600–3,000 | Clean, premium look |
| Brass/wood engraved holders | ₹200–500 | ₹4,000–10,000 | Fine dining presentation |
Staff Training Scripts
Week 1 Rollout Plan
- Day 1: Set up DineWave, enter full menu, download QR code
- Day 2: Print QR codes (self-print or order standees)
- Day 3: Place QR codes on tables, brief staff on scripts
- Day 4–7: Run hybrid (digital + paper backup), observe customer behaviour
- Week 2+: Add food photos, refine menu based on what customers ask about
- Month 2: Remove or reduce paper menus as QR adoption reaches 70%+
You're 30 Minutes Away from Going Contactless
Start your free DineWave setup now. Your can be live before tonight's service.
Create My Contactless Menu →Frequently Asked Questions
DineWave पर फ्री अकाउंट बनाएं → अपना मेनू डालें → QR कोड डाउनलोड करें → प्रिंट करके टेबल पर रखें। पूरा काम 30 मिनट में होता है।
No. DineWave menus open directly in any smartphone browser — no app download required. Customers scan with their default camera app (works on all iPhones and Android phones from 2018 onwards).
Your QR code links to a permanent URL. If a physical QR code gets damaged, just print a replacement — the code itself doesn't change, so you don't lose any menu data. Always keep a spare printed sheet as backup.
Yes — this is one of the key advantages. The QR code is a fixed link to your DineWave menu. Your menu content can be updated any time without changing the QR code. Add dishes, change prices, mark items out of stock — the QR continues to work.
Your DineWave dashboard gives you a shareable link (separate from the QR code). Send this link directly via WhatsApp — customers tap it and your menu opens instantly. Use this for takeaway orders, delivery, and pre-visit menu sharing.